![How to Start a WordPress Blog in 2021 [ Beginners Guide ] image](https://www.bloggingbig.com/wp-content/uploads/2020/04/How-to-Start-a-wordpress-blog-1024x393-1.jpg)
Are you planning to start a blog this year in 2021? well, you are in the right place. I will teach you how to start a WordPress blog in just 17 minutes even if you are a beginner to blogging.
Just keep reading. It’s very easy to start a blog
What is a blog by the way?
A blog is a website like a platform where you can write a story, share your thoughts, ideas or you can write about your business or anything you wish.
Imagine a blog as your notebook, what would you write in your notebook? You can write anything you wish. A blog is no different you can write anything you wish…
Before I take you into how to start a blog of your own let’s cover some frequently asked questions
FAQs: Frequently Asked Question About Starting A Blog
How Much Will it Cost Me to Start a Blog?
In order two start a blog it will cost you around 1-2$ USD for domain &It will cost 47.4 $ for site ground hosting. So altogether it will cost you around 48 -49 $ USD in a year
I don’t have technical skill can I start a blog?
Yes, you can easily start your blog even if you don’t have the technical skill, all you need to know is how to use the computer and internet. It’s very easy.
what do you need to start a blog?:
Things needed to start a blog are:
A domain name & A hosting
should I start a blog or vlog:
If you love writing you should start a blog. If you love speaking in front of a camera, you should start a Vlog. But from a money perspective starting a blog would give you more value.
Can Blogging Help You Get a Job?
Yes, Blogging Can help you get a job, every time I plan to switch a job I demo the employer that I know SEO knowledge and I get hired. Yes, blogging can help you get a job.
What technical skills will I need to start a blog on WordPress?
Knowledge of using the internet and computer is enough to start a blog on WordPress.
Should I start a blog or Instagram?
Of course, the blog is more profitable than Instagram, you should start a blog.
what’s the best platform to start a blog?
WordPress is the best platform to start a blog.
I want to start a blog but I don’t know what to write about?
For a starting phase, you can write anything about your favorite actors, favorite game, songs lyrics anything you wish, and later on you will get an idea then you can be specific that generates you money.
Is blogging or vlogging better:
Blogging is better than vlogging based on the profitability
Navigation
How to start a WordPress Blog in 2021 for beginners (step by step)?
The following are the simple 5 steps to create a blog of your own:
- Get a Domain Name for Your Blog
- Choose the Best Blogging Platform for Your Blog
- Buy Hosting for Your Blog
- Link Domain to Hosting
- Install WordPress to Your Domain
- Set up and Customize Your Blog
- Create and Publish Your Blog
Step 1: Get a Domain Name for Your Blog
Choosing a domain name is very simple work. A domain name is a name your website or your business.
In this blog ( you are reading right now ) I write about blogging tips so I decided to keep my website name Blogging BIG and I took a domain named bloggingbig.com this is the domain name of my blog.
There is no compulsion that you need to have a domain name with .com extension at last. You can choose any extension. But the best advice is to go with .com if you can find
And if you are a single person reading this blog right now, you can get a domain name as your own name.
And in case if you didn’t get the domain name of your choice you can get it in other extensions as well. An extension of your own country or.net extension or anything that suits you.
If you are in Nepal, you can get a free domain name of your own name from https://register.com.np/
If you wish to get a .com version as your domain name then you can get a domain name in cheapest rate from https://directnic.com/ or https://www.godaddy.com/
But never get hosting from these company they are good for the domain not for hosting
( I will give you the better option )
Now, let’s learn how to buy a domain name from Godaddy.
How to Get a Domain Name from Godaddy
Well if you want to purchase a domain name from Godaddy,
Head over to https://www.godaddy.com/
You will see a screen like below
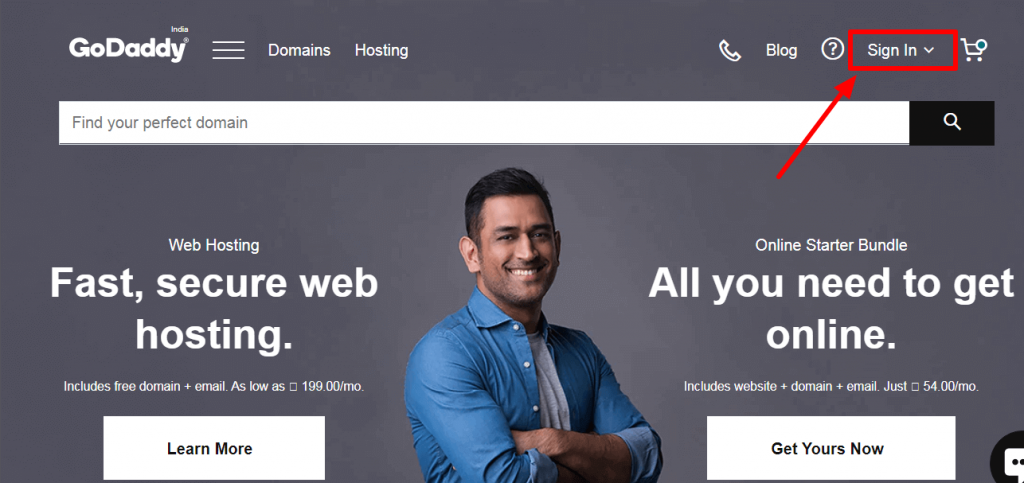
Then click on the sign-in button from the top right corner.
- Give your email
- Name
- The password you want a create an account
Once you are logged in Type a domain name you wish to get in the search bar as shown in the image below:
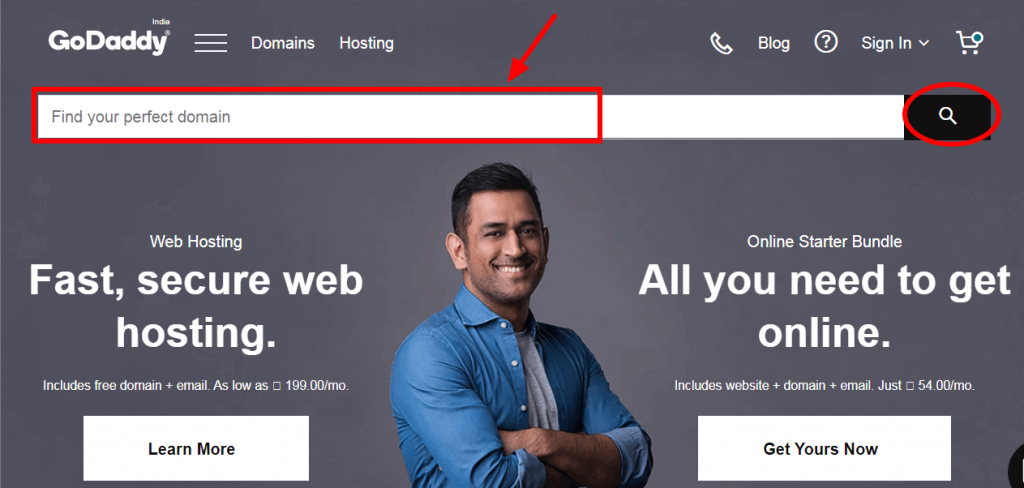
Then click on the search box at the right,
For now, let me try getting a domain name black Friday deals.online
I see this domain name “ blackfridaydeals2020.online” is available so I will click on continue to cart, in case if it was not available it would show already taken.
In such a case you can change your extension or see the other extensions recommended by GoDaddy.
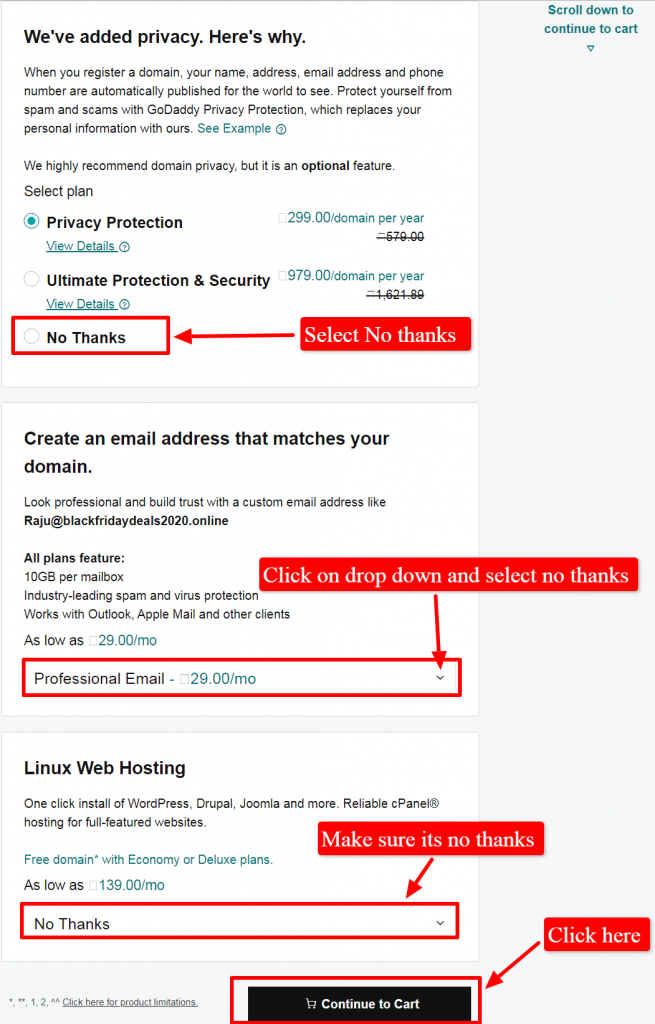
Once you find your domain click on continue to cart you will be redirected to a page which looks like the image below :

Note: “ there will be lot more options already selected make sure you choose no thanks on every step otherwise it will charge you a lot more money for no reason.
Once you do that click on continue to cart which will be at the bottom
After that, you will be redirected to the payment page, and on the right corner, there a period for how long you want to register your domain, it will be automatically selected 2 years. Go and change to 1 year, it will reduce your cost.
( don’t worry later on you can renew after one year if you wish to continue your blogging journey with the same domain )
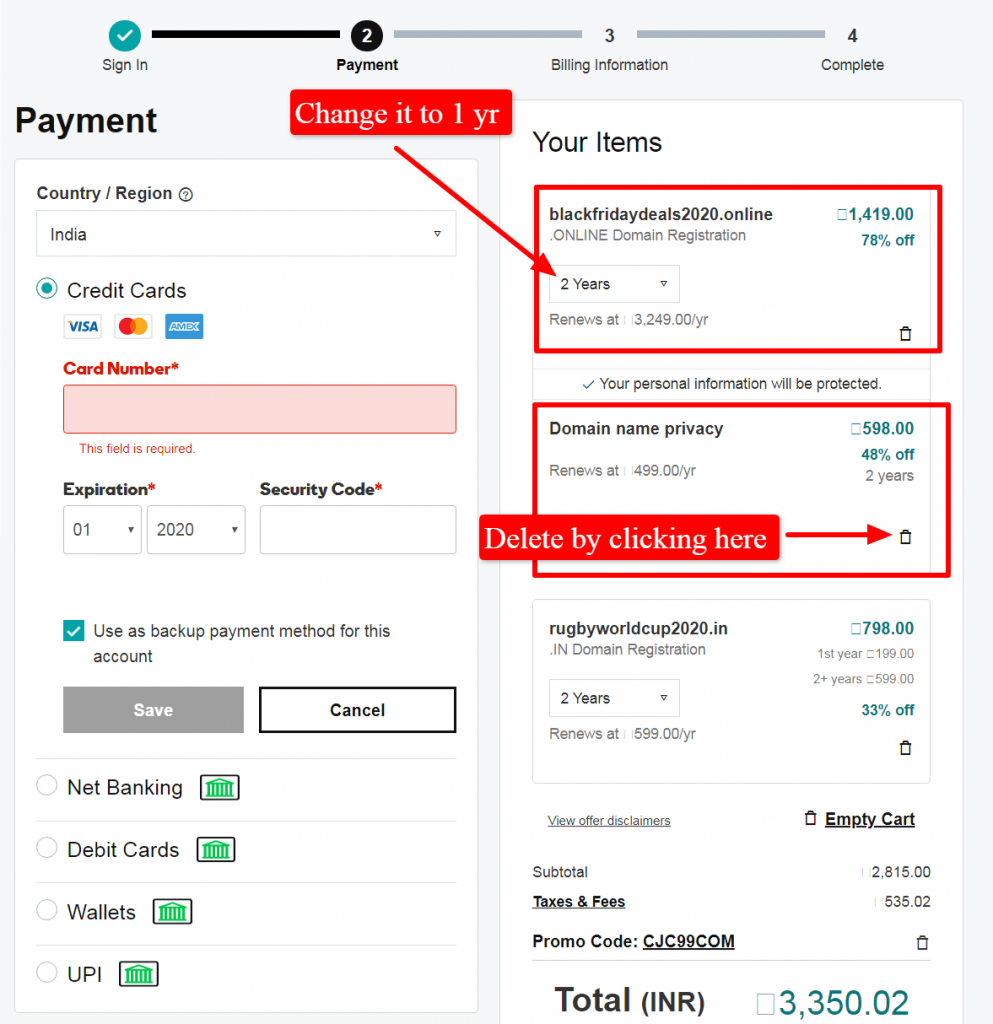
Once you complete your billing your domain is now registered.
Step 2: Choose the Best Blogging Platform
Now let’s learn how to choose the best blogging platform for you.
When a question of choosing a blogging platform arises you might have a
Do I go for a free blogging platform or do go with choosing a platform with money expenses
. following are some of the best blogging platform for you to choose:
- WordPress ( .org ): This is what I am going to teach here and this is the easiest one to use
- Medium
- WordPress.com
- Blogger.com
- Weebly.com
- Tumbler.com
Why WordPress is The Best Blogging Platform?
WordPress is a free and easy customizable blogging platform that allows you to have complete control over your website.
Following are some of the features that make WordPress the best blogging platform:
- It is free to use
- WordPress is a search engine optimized platform
- It is super easy for Installation and Upgrades
- Easy customization
- Plenty of themes & plugins available
- Easy user management
- Easy media management
- Flexibility to create any category of website
- World’s most used platform
- Choose your preferred blogging platform
- Self-hosting or a free alternative?
- Start a blog on your own domain (if you chose self-hosting and a custom domain)
- Designing your WordPress blog
- Easy to write a blog post & publish it
Step3: Choosing the Best Web Hosting Service for WordPress Blog
The next step on starting a blog as a beginner is to choose a web hosting service for your blog.
If you are a real action taker, by this time, you have two things ready
A domain name
The decision to choose WordPress as your platform ( don’t worry I will teach you exactly how to set up your blog on this platform )
Now the question comes Which Web Hosting is best for WordPress blog?
Yes, there are a lot of hosting companies, but I don’t want you to spend your time choosing and knowing how hosting works which hosting is best for you what alternative you have, etc.
I want you to take action right now and I want you to choose the site ground web hosting without any delay. Be an action taker without delay decide to go with the site ground hosting its the best one for you.
I am also personally using siteground for many of my websites. ( not this by the way )
Another great reason to choose siteground as your hosting is that,
You are a beginner so you are going to face a lot of trouble on your website in the coming days. You will make plenty of mistakes I am sure
For the same reason, they are the best with customer service you can do live chat fix your issue with no time.
That’s why I recommend you to go with siteground
How to Purchase Siteground Hosting For Your Blog:
Buying a siteground hosting is very easy, just click on the Link below
Once you click you will see a screen like below:
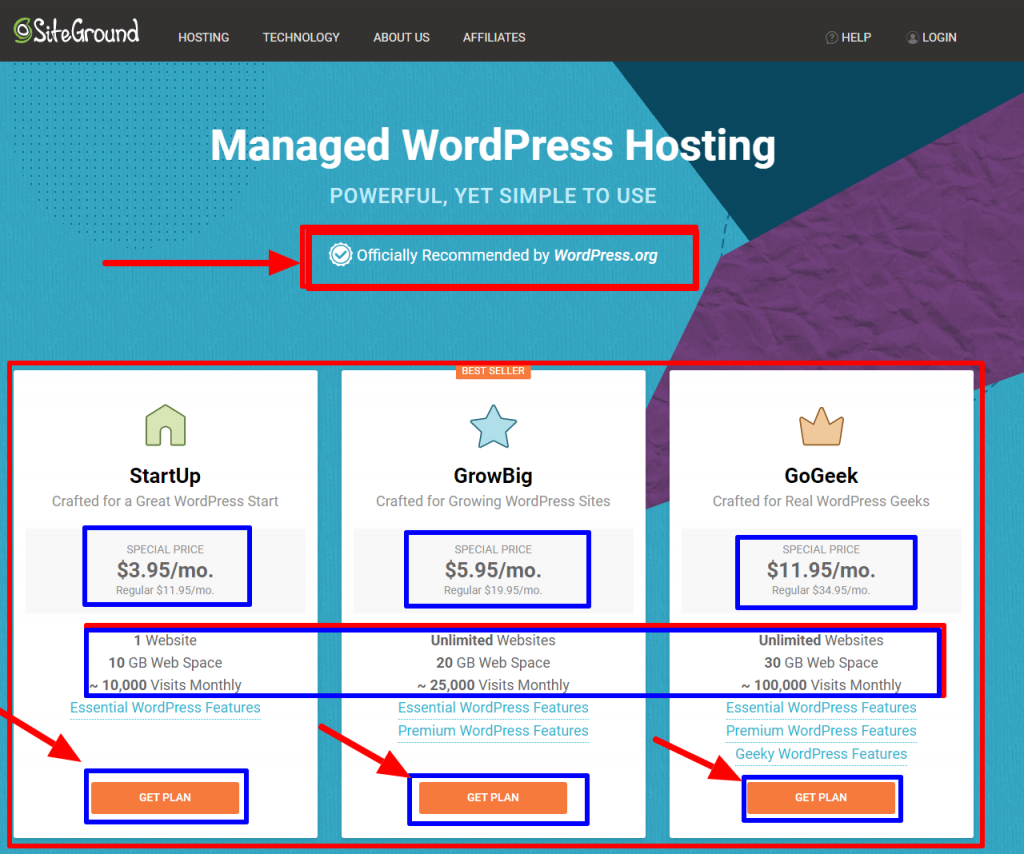
Go ahead and decide which hosting you need.
If you have the budget go with grow big plan
If not go with the startup plan.
Don’t waste your time on decisions take action along with this guide. Be an action taker. All you need to know is how much it costs you for each plan and how many websites you can host in each plan. Which is completely visible in the image above.
I hope by this time you have decided depending on your budget.
Now click on the get plan option
Once you click on get plan option you will see a screen like below:
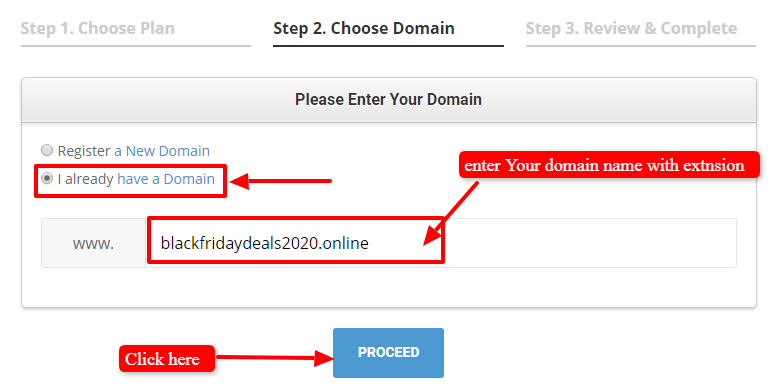
You have already bought a domain so click on I already have a domain box and then enter your domain name in my case I have entered blackfridaydeals2020.online
Even if in case you have not bought your domain go right now and buy and then come back or place any domain name you wish and click on proceed ( this can be changed later so don’t worry about it)
This is the case if you choose a grow big Plan otherwise put your original domain name if you are planning to go with only one website plan that is a startup plan
If you have not registered your domain name yet when you put your domain name siteground would tell you to register from them, don’t do that, get it registered from godaddy or from directnic as siteground charges more money for domain registering.
Once you click on proceed button you will see a screen as shown below:
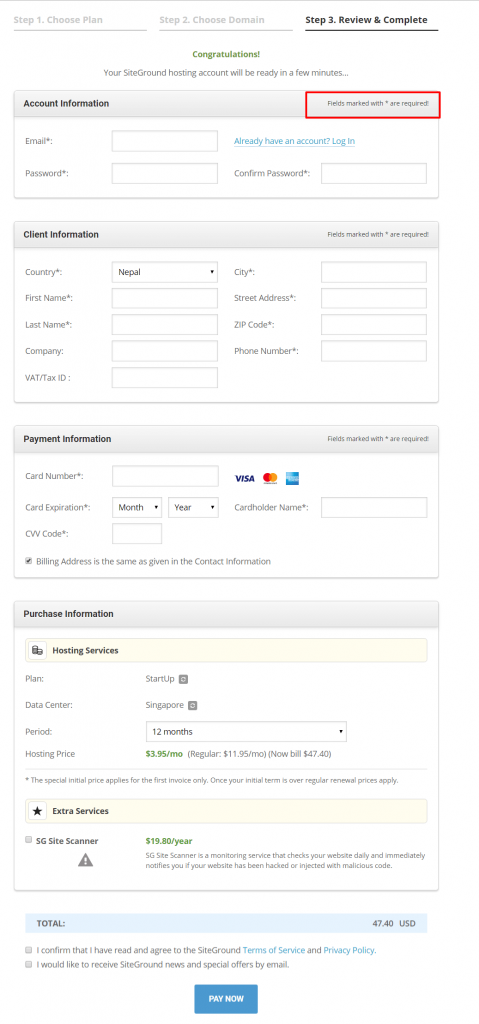
Once you reach to this window fill up all the * marked fields and make the payment.
If you find site ground be more costly I have alternatives for You. Thought siteground is best if you can do buy that
Message me on facebook for siteground alternative
Once you make a payment you will get login details and the nameserver details of your hosting on your Gmail.
Take a note of this nameserver.
Later you need to use it.
wow !!! if you completed buying hosting and domain next step is to configure the hosting and domain name together.
I will teach you that step now.
In case if you completed buying hosting but you felt configuring things tough let me know here on my facebook profile I will help you personally for this.
Step 4: Link Domain to Hosting:
Once you have ordered your hosting and domain the next step is to connect the domain and hosting together
Now, here I am assuming that you have bought hosting from site ground and domain name from the Godaddy. So now, I will teach you how to link domain to hosting in Godaddy.
Steps to connect a domain to hosting in godaddy:
Step1: Sign in to a godaddy website:
Use the same username and password to login to a godaddy account
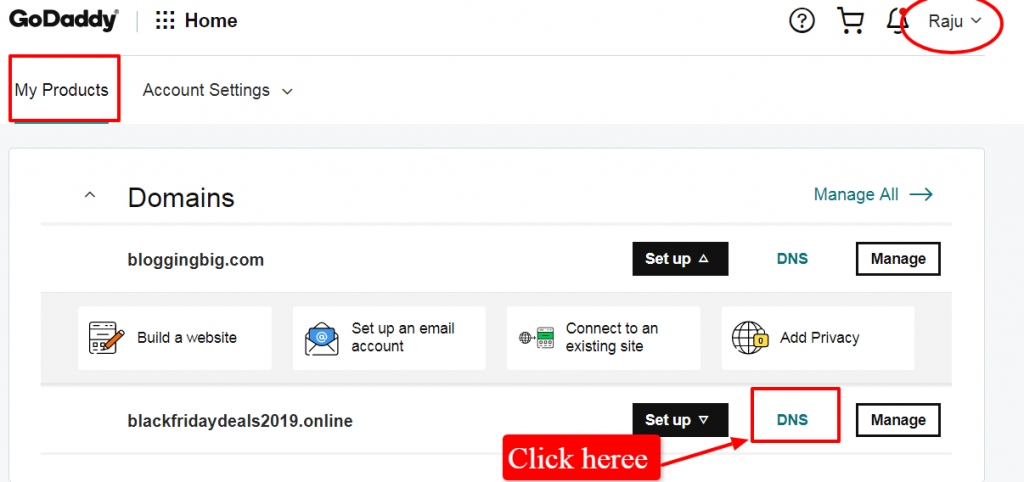
Step 2: Reach to my product section:
Once you login to your account you will reach to the product section and then click on the DNS tab corresponding to your domain name. In my case, let’s click on the DNS section of blackfridaydeals2019.com as shown in the image below:
Step 3: Change the Nameserver:
Once you click on the DNS tab you will reach to domain management page there you will see an option to change nameserver as shown in image below, just click on change
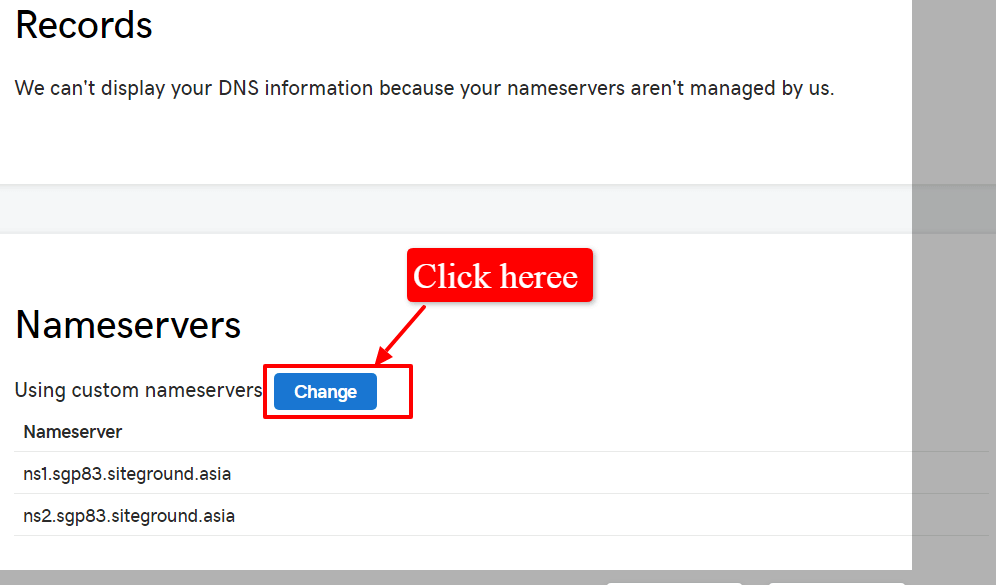
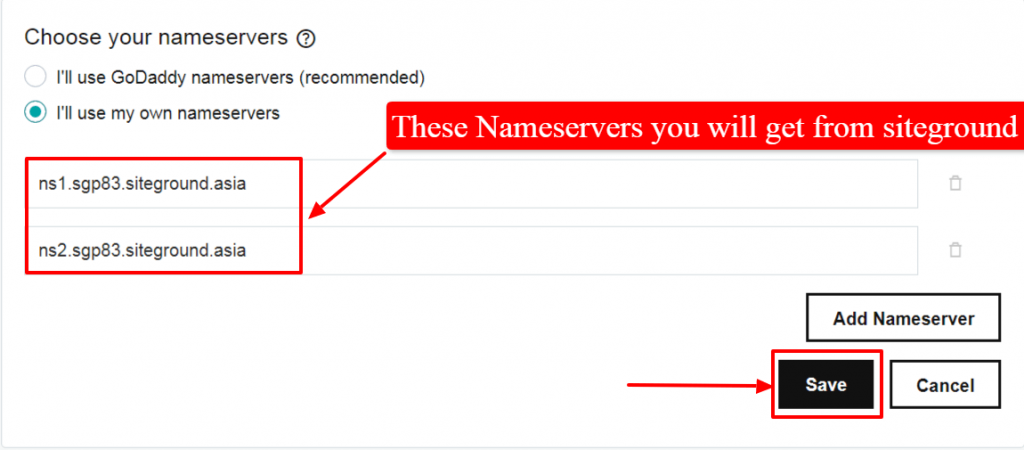
You can get the Nameserver details in the gmail account sent by a hosting provider you need to place both nameservers here.
If you are using siteground hosting, as I advised you can log in with the email and password you used to create an account
To find nameserver in siteground hosting
- Once you logged in into the siteground click on my account
- Click on go to Cpanel( which is at the left side)
- On the top left side, you will see your two nameservers.
These are the same nameserver ( NS) you need to use in godaddy.
Otherwise the best solution is to see at the mailbox of your gmail account.
Step 5: Install WordPress to Your Domain
Now let’s learn how to install wordpress to a domain. In order to start a blog next step is to add a wordpress to your website. And siteground has a one-click wordpress installation feature which is a very easy thing that everyone can do it.
So now, let’s head over to siteground and login with the same account.
Now, let me click on my account
You will see an interface like this

Now, click on go to Cpanel
After clicking on go to Cpanel you will see an interface as like in the image below:

Under a wordpress tools section let’s click on wordpress installer icon.
Once you click on WordPress installer, you will see an interface like this:
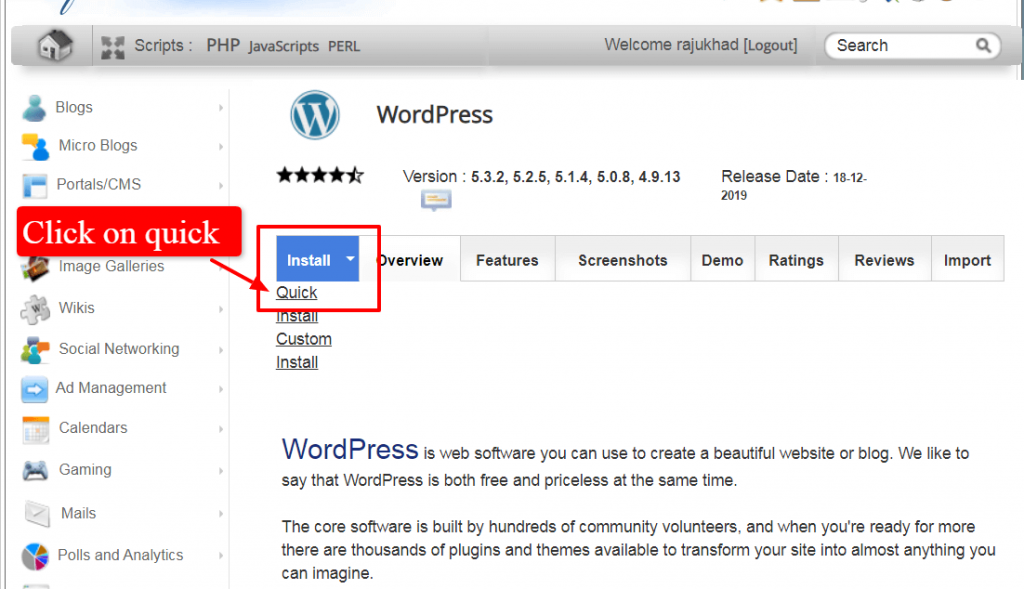
Now, click on install option
If you click on the drop-down arrow you will see a quick install option click on it. Then you will see a screen like below:
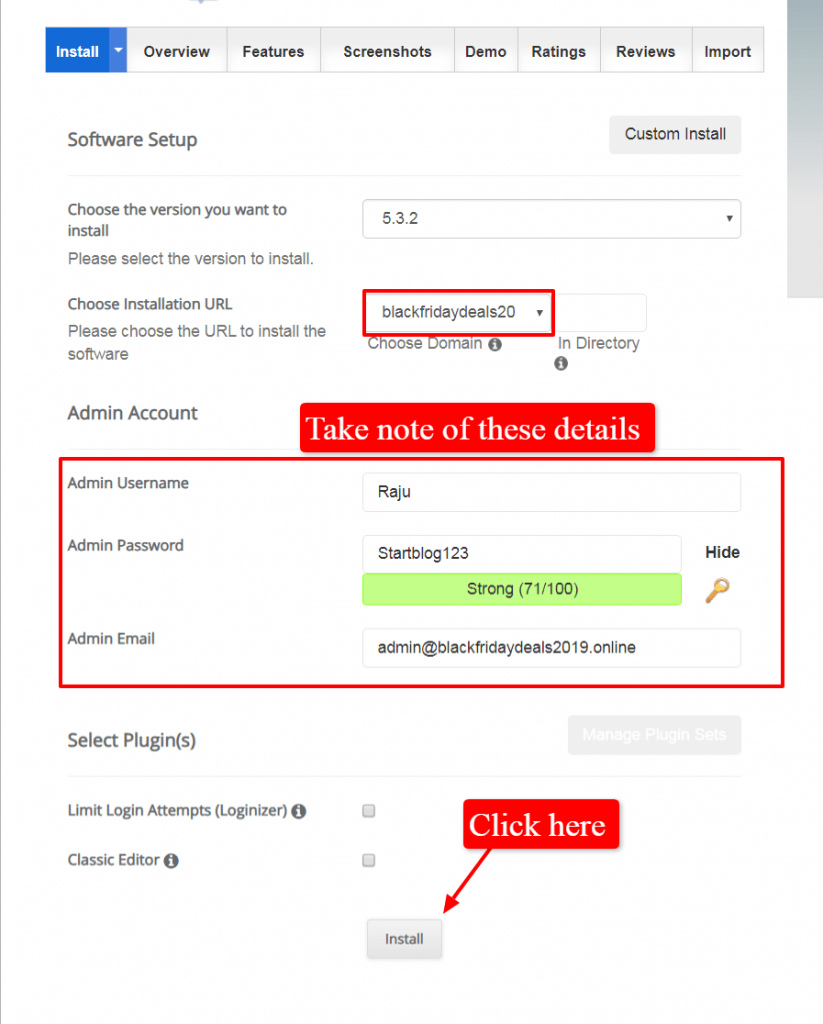
now, choose a domain option place your domain name along with the proper extension
And place admin username
Admin password
Admin Email
These are the details you need in the coming days.
Once you click the install button your wordpress will be installed automatically.
You don’t need to care about your database, user management, media management etc all will be maintained automatically.
Congrats!!! now your blog is ready.
Once you complete this step, If you go on the address bar and enter your URL name, you should definitely see your website.
I know it doesn’t look good so we need to customize it properly. So now, let’s learn that.
Step 6: customize your WordPress Blog
Now in this section, we will learn how to customize a blog on wordpress And make the design a bit attractive.
Now, In this stage, you need the admin user name and the admin password you used in the previous step while installing WordPress
Now go to the URL bar and type : yourdomain/wp-admin and press enter.
You should see a screen like below

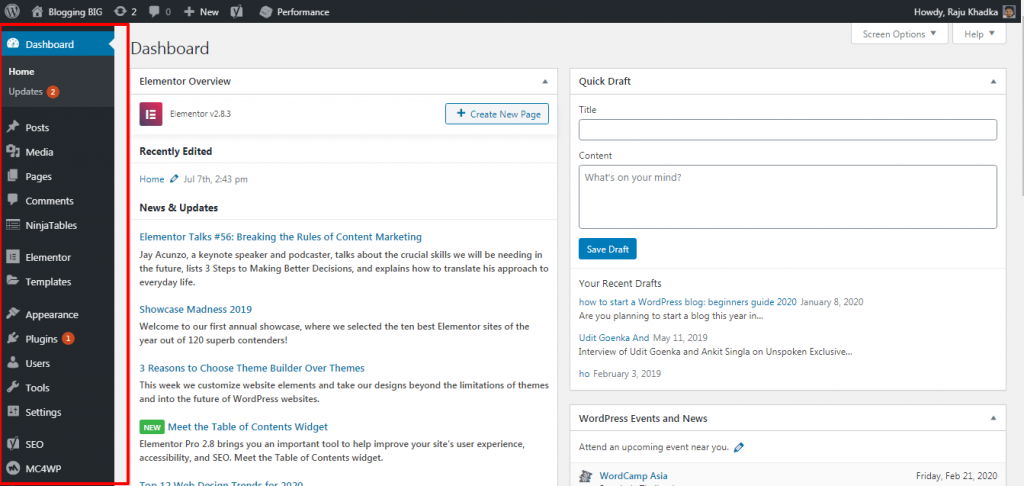
Once you login you will reach to the dashboard and there is where you can start customizing your website.
Now, What I will teach you is how to install a new theme, how to install a plugin and how to write your post and publish it.
Then the blogging journey starts and you need to keep learning yourself and keep growing further.
Now after logging in you will see a wordpress dashboard which looks like in the image below:
Now let’s learn how to install a theme:
How to Install a New Theme on WordPress:
To add a new theme on wordpress is a very easy process all you need to do is go to:
Appearance >> theme >> Add new
After you click on add new you can install a theme if you have downloaded already or you can install any free theme available on the wordpress repository.
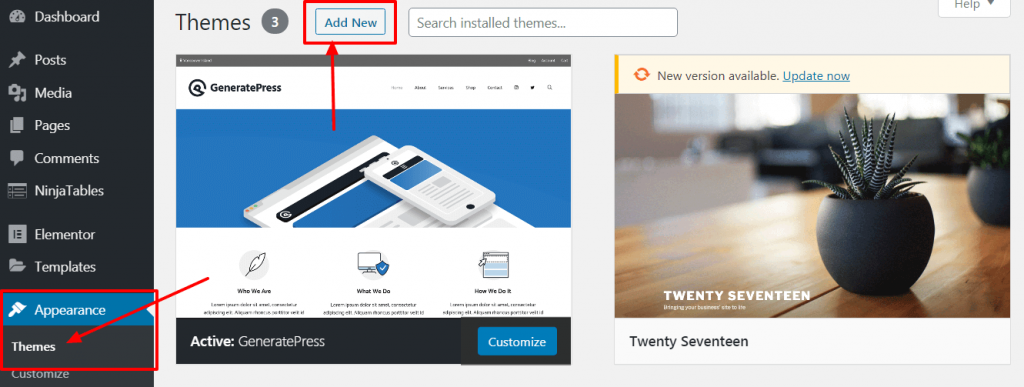
If you have not downloaded any theme already on a search box search generate press.
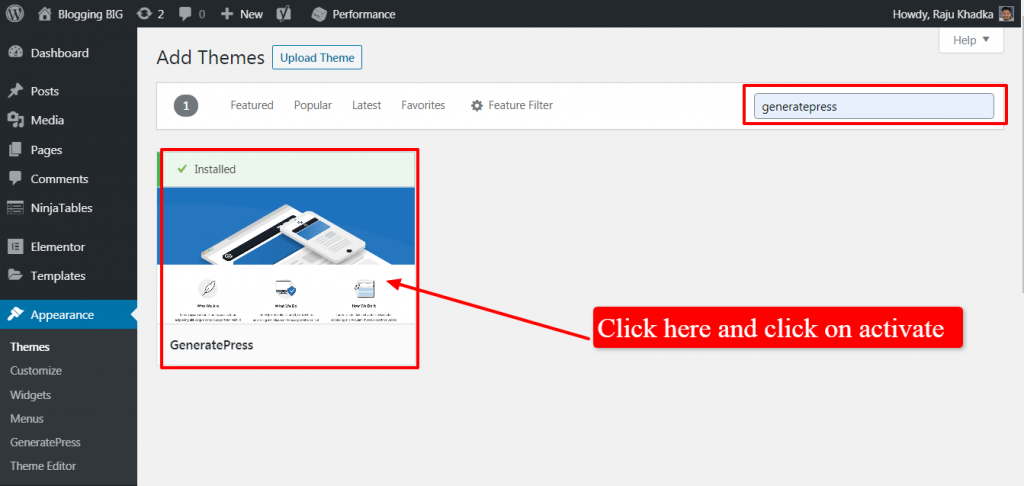
It’s a free theme its a very good one and light one
And then click on install you will have now theme installed.
How to install a new Plugin in WordPress:
well, when you start your blog there are certain necessary plugins you must install so let’s learn how to install it.
Some necessary plugins for wordpress blog are:
- Seo plugin ( Rank Math or Yoast SEO )
- Updraft plugin ( For backup )
- Anti-spam ( protecting from spam)
- W3 Total Cache ( For increasing page speed )
- Smush plugin ( Compressing image )
Here is how to install a new plugin in wordpress:
Step1: Go to wordpress dashboard:
You can go to your dashboard by logging in from yoursite.com/wp-admin
Step 2: Click on Plugins:
plugins option is on the left side
Step 3: Click on the Add new Plugin:
Search Your plugin name.
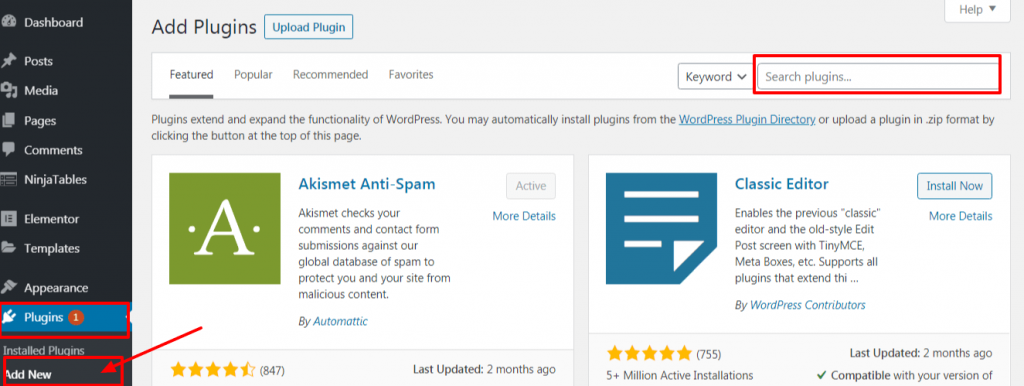
Step 4: Install/ Activate Plugin
Step 5: Configure Plugin ( if necessary )
Configuring plugin is not necessary all the time, sometimes installation is enough. But some plugin needs configuration. Configure it as per its requirement.
If you would like to learn it from Video here it’s
Step 7: Add a New Post in WordPress: Writing Your First Blog Post
Now You are at the last step of your wordpress blog starting the process and let’s make this year 2021 an awesome. You deserve it.
Here is what you need to do to add new post on wordpress blog:
Step 1: Go to Dashboard
Step 2: click on Post section
Step 3: Click on add new
Step 4: Write a blog post
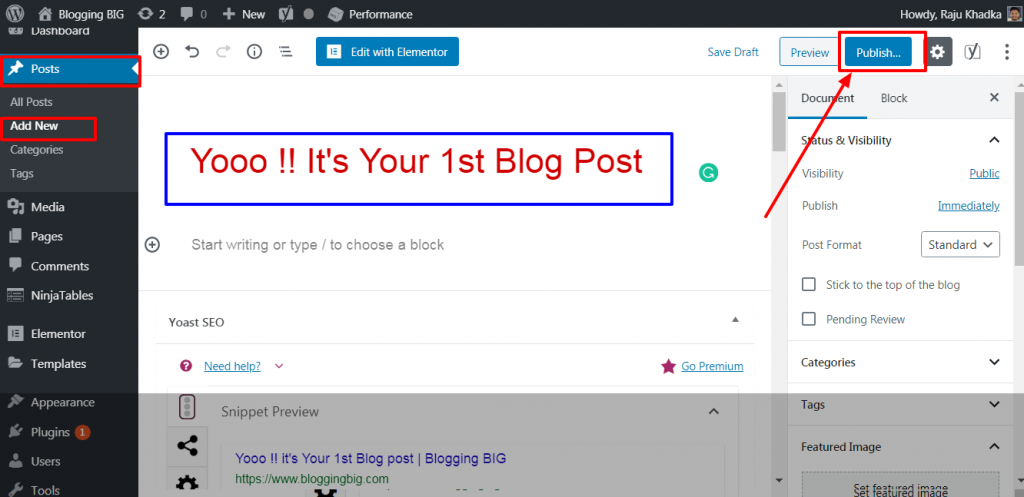
Congrats !!! you have your own blog now … great buddy if you have any issue in setting up your blog contact me personally, I will help you one-on-one.
Give yourself a pat on the back very few reaches to this place that proved you are a true winner
Writer’s Note: Very Important
And if you don’t take action. You are never going to be successful in life I guarantee. Don’t dream take action and become more productive day by day … Achievers are always action takers.If you like this post share it

Thanks for valuable article
you are most welcome brother
Thanks for Sharing Your Knowledge.
I have a question regarding Smush Plugin.
As per my experiences, Smush doesn’t perform well.
Is it enough to optimize any sizes/resolutions of Images?
Thank You !
Before uploading image make sure you reduce the size with the help of tinypng.com don’t upload without reducing it. then its okay to use smush for forther reduction and see how much it can help you out
Daju How you have done this
Quality content brother 🙂
It was really an informative article.
Thank You so much sushil brother. I very much appreciate you liked the content
Raju, this was the exclusive step by step walkthrough guide for creating a new blog. I believe this is how such a blog post should be presented without any steps skipped, as it is for the new bloggers.
Blogging has immense scope to make passive money and certainly, SiteGround is always my recommendation as well, while creating a new website for my clients. They have dramatically grown because of their awesome services and optimal servers. Highly recommended.
~Navin
Thank you so much Navin Rao Bhai for such a nice Comment 🙂
This article is helpful for me. I was not using any plugin for compressing images but now I am thinking to use smush plugin after reading this article. Thank you.
You are most welcome brother 🙂